

Setting Up TypeScript Code Auto Linting And Formatting For VS Code

Intro: The combination of TypeScript and the VS Code IDE is a match made in heaven. Compared to other IDEs and code editors, using VS Code to develop your TypeScript application makes things easier once you've completed the necessary setup.
This guide will show you how to set up your dev environment to automatically format your code to conform to a pre-defined format. This is useful, for example, when working as part of a software development team, so that your code is formatted uniformly and in an expected format. Your code will also be readable. We'll also implement a linter to catch bugs in our code early.
Prerequisites:
- I assume you've already install VS Code, if you haven't, you can do so by downloading VS Code here for your OS and follow the installation instruction.
- You should also have installed Node in other to use npm (Node Package Manager). You can get Node here for installation if you haven't installed it yet. Be sure to choose the LTS version.
- I also assume you already know how to set up a TypeScript project using VS Code combined with maybe Webpack and Babel. You may want to checkout my post on this topic here.
Let's get started.
Step 1: Create a Project Folder:
We start by creating a folder for our project; we'll call this folder lpts, you're free to give it any name you want. Right-click on the folder and select Open with code option to open it in VS Code. Once the folder is open in VS Code you can move to the next step.
Step 2: Initialize the Project:
Initialize the project by running the following command from within the VS Code command line tool (Locate the tool by selecting the Terminal menu at the top and choosing the the New Terminal option).
npm init -yNOTE: Always remember to press the ENTER key after entering a command in order to run it.
After running this command, the project folder should now contain a package.json file.
Step 3: Install ESLint :
ESLint will help us to detect bugs or error and may also point us to inefficient part of our code.
To install it run the following command:
npm install --save-dev --save-exact eslint @typescript-eslint/eslint-plugin @typescript-eslint/parser eslint-config-airbnbOnce the above command is successful, ESLint and its associated tools will appear in our package.json file.
Step 4: Install Prettier :
Prettier helps us to format our code based on the rules we give it, making it properly laid out. We will also configure Prettier such that it can do this magic automatically each time we save our code.
To install Prettier let's run the following command:
npm install --save-dev --save-exact prettierStep 5: Create .prettierrc file:
The rules that guides how Prettier formats our code is usually contain in a .prettierrc file usually located at the root of our project folder. Create the file and copy, paste, and save the rules below into the file:
{
"printWidth": 100,
"singleQuote": true,
"semi": true,
"tabWidth": 2,
"trailingComma": "all",
"endOfLine": "auto"
}
Step 6: Create .eslintrc.json file:
The .eslintrc.json file is used to hold the configuration details for ESLint.
Create a file in the project folder and name it .eslintrc.json . Copy, paste and save the code below into it:
{
  "extends": [
    "eslint:recommended",
    "plugin:@typescript-eslint/recommended",
    "airbnb",
    "plugin:prettier/recommended",
    "prettier/@typescript-eslint"
  ],
  "parser": "@typescript-eslint/parser",
  "plugins": ["@typescript-eslint", "prettier"],
  "rules": {
    "prettier/prettier": "error",
    "@typescript-eslint/indent": ["error", 2],
    "@typescript-eslint/no-unused-vars": "error",
    "@typescript-eslint/no-explicit-any": "error"
  }
We now have the tools we need installed together with their respective configuration files. The next step is to link VS Code with these tools so that we can use them automatically while writing our code rather having to manually use the command line to invoke them each time we want lint or format our code.
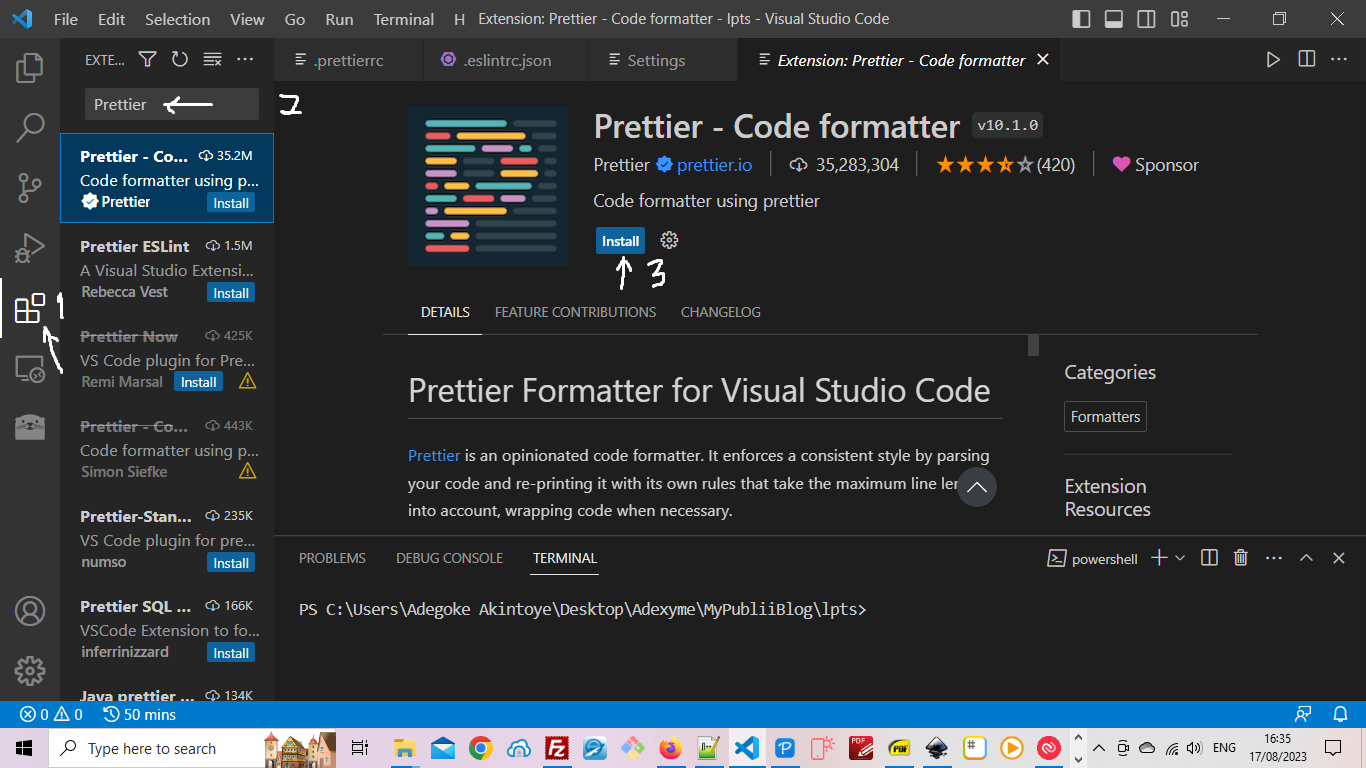
Step 7: Install Prettier Plugin for VS Code :
To install this plugin, in VS Code, click the Extension button, labelled 1 in the image below, and enter the word Prettier to search for the plugin. Other plugins with similar name may appear but what we want is the one named Prettier - Code Formatter. Click on it to be sure you're selecting the right plugin and then click the install button to install it.
After installation move to the next step.
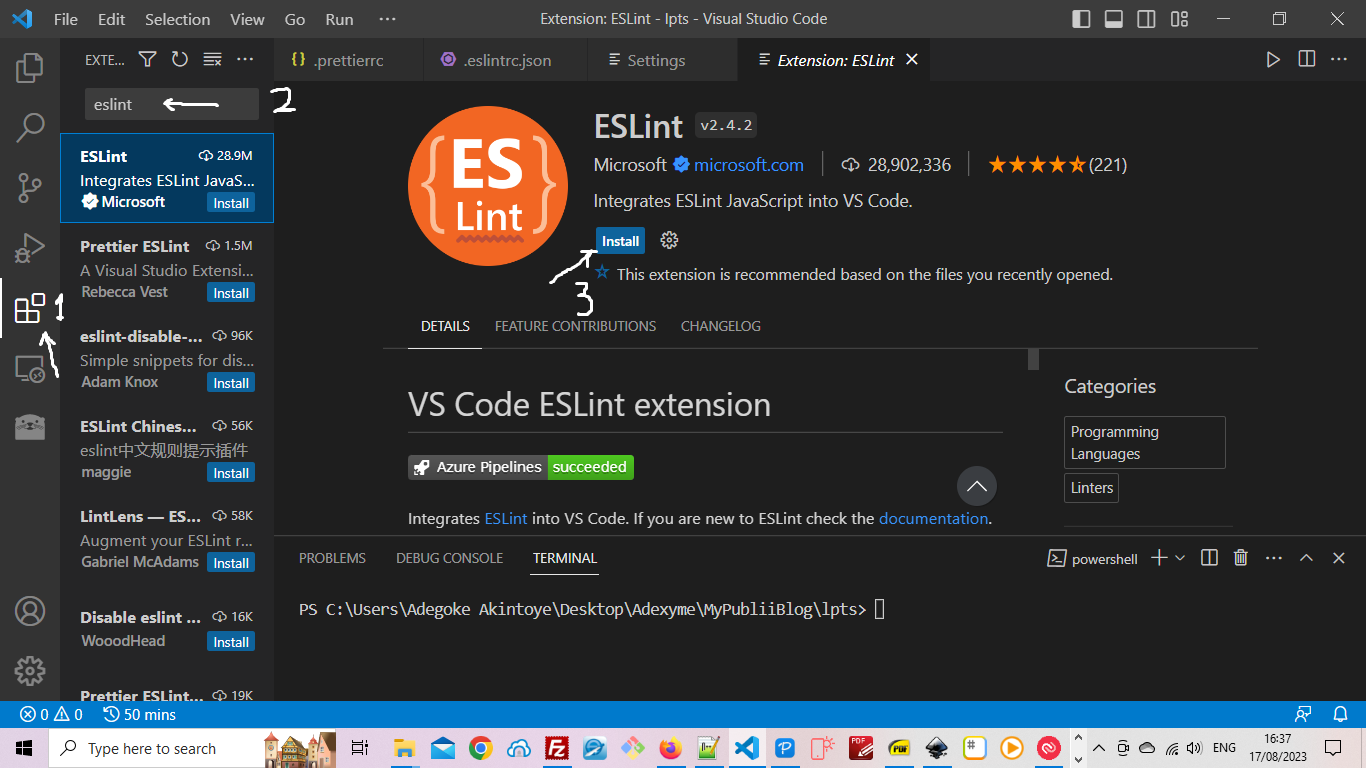
Step 8: Install ESLint Plugin for VS Code :
To install this plugin, follow the same steps above for the Prettier plugin but this time search for the ESLint plugin as shown below. Of course, once you've located the plugin, install it.
Step 9: Configure Code Auto Formatting:
What we want to do next is set things up such that each time we save our code in VS Code Prettier should automatically format our code for us.
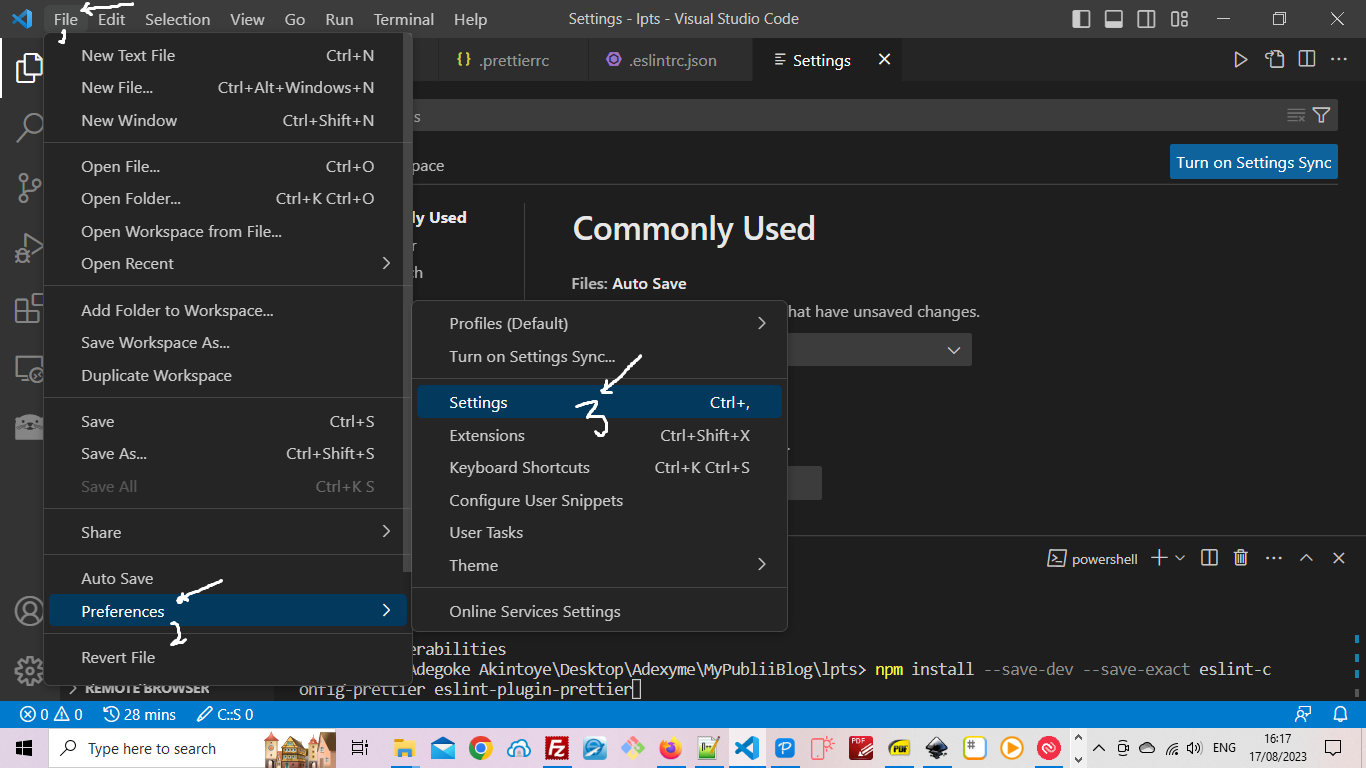
To do this, in VS Code, go to File > Preferences > Settings as shown in the image below:
After clicking on settings , the setting page should open as shown below:
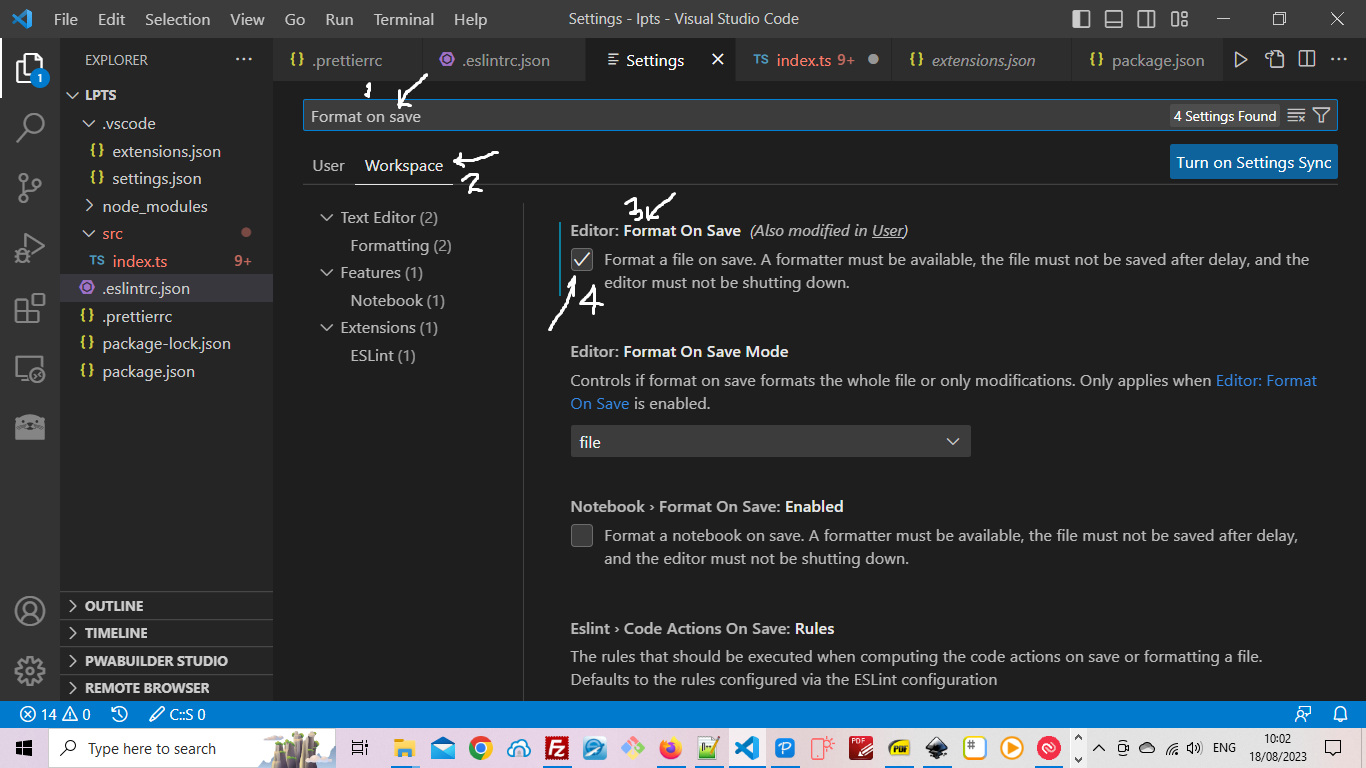
Following the cue in the diagram above, enter Format on save in the search box, select the Workspace tab is selected, then ensure that the checkbox under Editor: Format On Save is checked.
Lastly for this step, type Default Formatter into the search box and the page should display as below:
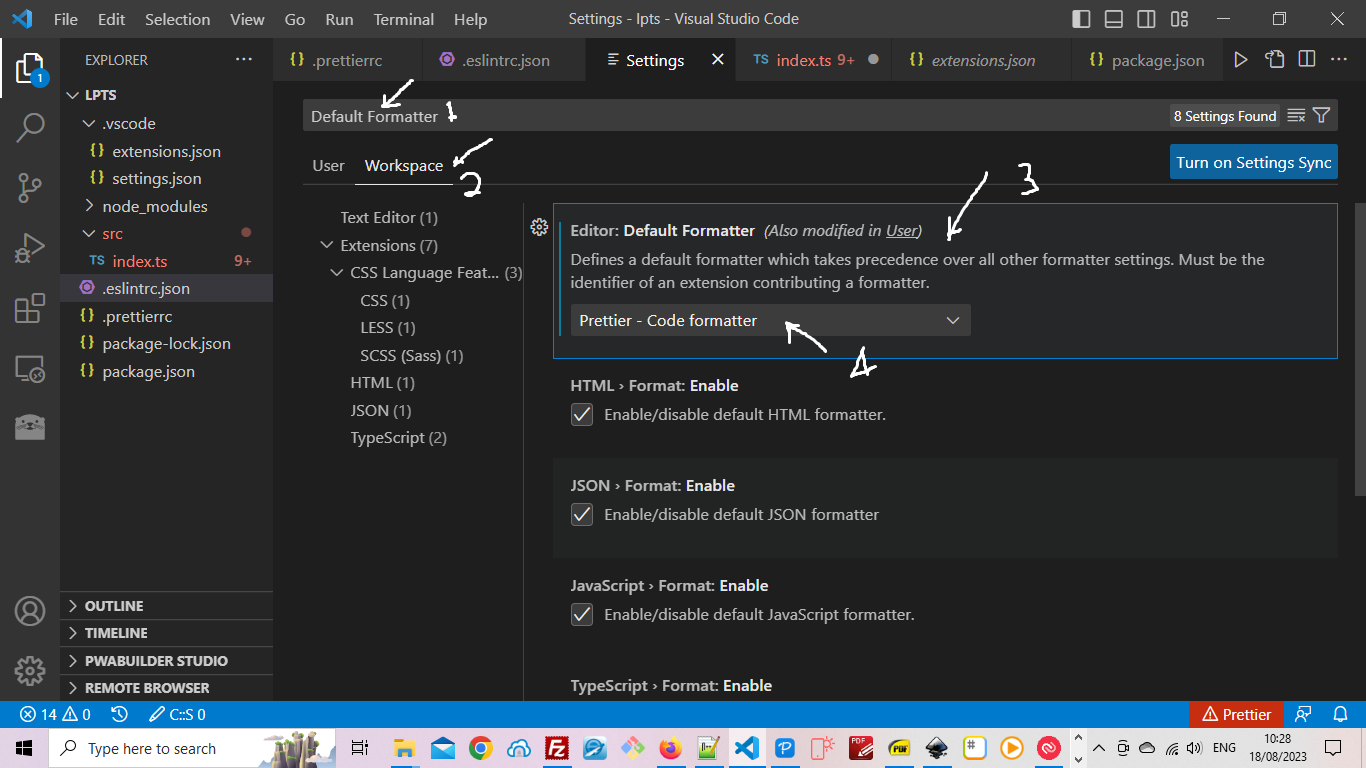
Ensure that the Workspace is selected and that under Editor: Default Formatter the Prettier - Code Formatter option is chosen.
Now each time you save your code, it should always readjust itself for proper formatting based on the rules we supplied Prettier earlier - remember that you can change the way your code is formatted by changing this rules.
Now to the last step.
Step 10: Configure Code Auto Linting:
To ensure our TypeScript code is auto linted, revealing errors or inefficient code block while we type, we need to tell VS Code what we want, similar to what we did for Prettier in the last step.
Go to File > Preferences > Settings like we did earlier and type eslint: probe into the search box ensuring also that the Workspace tab is selected

Now under eslint: probe ensure that typescript was included, if not include it using the Add Item button.
And that is it. You're good to go.
Well-done.
Comments